 3G Eden
 RSS
RSS本文介绍了一种针对于 Eclipse 程序的远程自动化测试技术。该技术结合了 XML-RPC 技术和 GUI 自动化测试库 Abbot SWT,适用于网络协作、富客户端以及即时通信软件的自动化功能测试。本文首先介绍了 Abbot SWT 的简单应用,然后介绍了远程测试技术的架构和实现,最后通过一个部署远程测试实例来说明该技术的应用方法。
前言
现在 Eclipse 平台被广泛应用于各种软件的架构中,从开发工具到测试工具,从网络协作软件到即时通讯工具,Eclipse 平台被证明了其强大的跨平台,可扩展,可配置的优良特性。正因为如此,对 Eclipse 程序的测试也越来越流行。Abbot 是一个开源的 Java 程序的界面自动化测试库,Abbot SWT 是其中一个子项目,专门针对于 SWT 程序的测试。但是,Abbot SWT 只能对本地的程序进行测试,当我们所需要进行的 GUI 功能测试需要多个协作软件之间进行通信时,Abbot SWT 库只能测试其中一个程序,而不能同时测试部署在不同机器上的基于 Eclipse 软件。我们可以将 XML-RPC 技术同 Abbot SWT 库相结合起来,远程测试基于 Eclipse 的程序,这样可以同时测试部署在不同位置的 Eclipse 程序之间的协作和通信。大大扩展了 Abbot SWT 库的使用领域。
本文首先从 Abbot SWT 的基本用法开始,然后介绍如何结合 XML-RPC 和 Abbot 库进行远程的自动化测试,最后介绍一个实际的部署和远程自动化测试的实例。
用 Abbot 进行 Eclipse 程序的 GUI 功能测试
Abbot SWT 是一个优秀的 GUI 功能测试库。它能够对 SWT 控件、窗体和菜单进行功能性自动化测试。同时它又是一个 Eclipse 插件,可以直接安装到 Eclipse 程序中来做针对界面控件的单元测试。
我们可以在 JUnit 单元测试用例中调用 Abbot SWT 插件来进行 GUI 自动化测试。一个简单的测试用例如清单1所示。该测试用例是用来测试一个 Text 控件是否能够正确输入文本,通过获得该控件的当前内容来与输入文本进行比较来判断结果的正确与否。
清单 1 一个基于 Abbot SWT 库的 JUnit 单元测试用例
public class TextTesterTest extends SWTTestCase {
Shell shell;
protected void setUpDisplay() {
		super.setUpDisplay();

		shell = createShell();
		shell.setLayout(null);
		Text text = new Text(shell, SWT.MULTI | SWT.WRAP);
		text.setSize(190, 190);
}
// Test case: input text and verify
public void testSetText() throws NotFoundException, MultipleFoundException {
	TextTester textTester = TextTester.getTextTester();
	WidgetFinder finder = WidgetFinderImpl.getDefault();

	// Set up testing environment: show the shell
	syncExec(new Runnable() {
		public void run() {
			shell.setLocation(100, 100);
			shell.open();
		}
	});

	sleep(1000);

	// Force it to be active and give it a moment to do so.
	syncExec(new Runnable() {
		public void run() {
			shell.forceActive();
		}
	});

	WidgetTester.getDefault().waitForIdle();

	// Find the text widget instance
	Text textwidget = (Text) finder.find(shell, new WidgetClassMatcher(Text.class));

	// Do the testing, click the widget, input text, verify the result text
	String string = "example text...";
	textTester.actionClick(textwidget);
         textTester.actionKeyString(textwidget, string);
	assertEquals("Wrong short text typed,", string, textTester.getText(textwidget));
}
//... Other methods and test cases
|
Abbot SWT 库提供了用于不同搜索条件的匹配类( WidgetTextMatcher, WigetClassMatcher … )和用于查找控件的查找类( WidgetFinder ),通过不同的匹配条件对象作为参数传给控件查找类,从而返回所要测试的控件。代码片段如清单2所示。
清单 2 Abbot SWT 的匹配类和查找类
TextTester textTester = TextTester.getTextTester(); WidgetFinder finder = WidgetFinderImpl.getDefault(); Text textwidget = (Text) finder.find(shell, new WidgetClassMatcher(Text.class)); |
通过控件类(Text.class)和 WidgetClassMatcher 类来搜索被测控件的对象,然后获得该控件对应的测试类,来进行测试。对 Text 控件来说,对它的测试代码如清单3所示。
清单 3 Text 控件测试代码
	// Do the testing, click the widget, input text, verify the result text
	String string = "example text...";
	textTester.actionClick(textwidget);
	textTester.actionKeyString(textwidget, string);
	assertEquals("Wrong short text typed,", string, textTester.getText(textwidget));
|
通过 TextTeser 类的点击测试方法 actionClick 点击该控件,通过 actionKeyString 来输入测试文本,通过 getText 获得当前显示的文本属性,最终验证结果的正确性。
通过上面的例子我们可以看到,通过 Abbot SWT 提供的 Finder 类和 Matcher 类,可以获得我们所期望的控件的对象,通过控件类所对应的Abbot 的 Tester 类,我们可以进行不同的测试,包括鼠标,按键,快捷键,拖拽以及组合键的输入等等。这样我们就可以通过创建 JUnit 的用例来测试 GUI 程序中的不同控件,验证其正确性。
结合 XML-RPC 技术和 Abbot 来实施 Eclipse 程序的远程测试
Abbot SWT 插件需要和被测的 Eclipse 程序处于同一个进程中,而不能跨进程测试其他程序。这就限定了该库只能用于进行 UI 组件的单元测试中,而无法作为一个功能测试工具来测试不同进程的程序,更不用说测试分布在网络中的不同机器上的程序。但是,我们可以通过扩展 Abbot SWT 库,基于 Eclipse 平台和 RPC 技术,将 Abbot SWT 的接口类开放到网络中,作为网络服务提供给运行测试用例的客户端,这样就能够跨进程、跨网络来进行功能测试。下面首先介绍一下该方法的总体架构,然后是其中的一些关键技术。
系统架构
我们选择 XML-RPC 作为远程测试 Eclipse 的基础 RPC 方法。XML-RPC 作为传统的 RPC 技术,其有着成熟的技术和库,而且实施简单,调试方便,非常适合简单应用的 RPC 技术的基础。通过在被测的 Eclipse 程序中添加一个自动化测试服务的插件,该插件开放 RPC 服务,就能够让客户端调用该服务来与被测程序中的 Abbot SWT 插件进行通信,从而进行远程的测试。其顶层架构如图 1所示。
图 1. 顶层架构
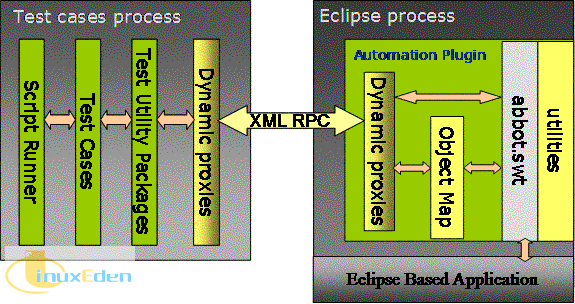
从该顶层架构我们可以看到,测试用例可以是一个脚本、一个程序也可以是一个 JUnit 测试用例。它通过调用 XML-RPC 服务,和被测进程中的 Abbot SWT 库通信,通过构建自己的功能测试逻辑来最终进行远程地自动化功能测试。一个典型的自动化测试过程如图 2所示。
图 2. 典型的远程测试过程
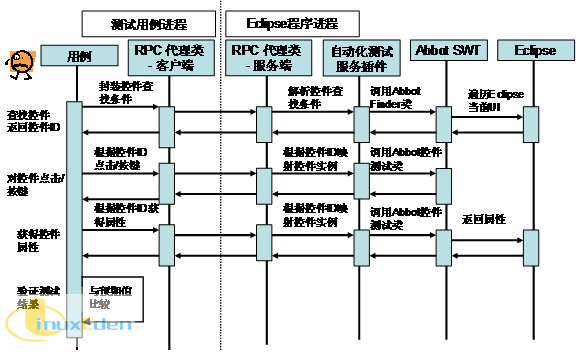
从图 2我们可以看到,这个自动化测试服务插件将 Abbot SWT 的类接口作为 RPC 的服务开放到网络中,将收到的 RPC 请求转成 Abbot SWT 库的调用。同时,由于在网络中无法传递控件的对象,这里用控件的 ID 值来表示被测控件。最后在测试用例进程中来判断比较测试结果,提交报告。
下面我们详细叙述其中的关键技术:控件和 ID 之间的映射和 RPC 动态代理。
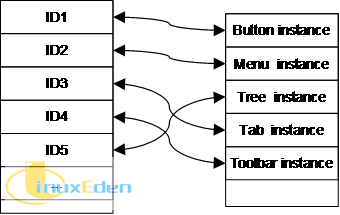
控件 ID 映射
由于 RPC 的方式无法传输一个被测控件的对象,我们用整数值来表示一个被测的控件,这就要求对每个 SWT Widget 类的对象进行映射,将每个被测的对象和一个随机的整型数对应起来。在上述的自动化测试服务插件中,生成这样一张表:它将一个整型数对应到一个 UI 控件对象,同时也能将一个 UI 控件的对象对应到一个整型数,这样能无论是从一个 ID 到一个控件对象,还是从一个控件对象到一个 ID ,都是 ο(1) 的时间复杂度。其数据结构如图 3所示。
图 3. 控件映射数据结构
在具体的代码实现中,可以通过2个 HashMap 来实现,其定义如清单4。
清单4 HashMap 实现双向映射
public class WidgetTable {
private Map<Integer, Object> ID2Objecttable = Collections
			.synchronizedMap(new HashMap<Integer, Object>());
	private Map<Object, Integer> Object2IDtable = Collections
			.synchronizedMap(new HashMap<Object, Integer>());

	public Object lookup(int id) {
		return ID2Objecttable.get(new Integer(id));
	}
	//...
|
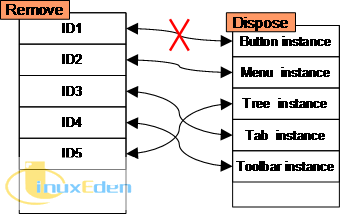
但是,由于 SWT 控件可有在测试过程中被销毁,这样在控件映射表中也必须将销毁的控件删除。所以在每次往表中注册添加一个控件的时候,给该控件添加一个 Dispose 的侦听器,这样当该控件被销毁时,也相应的在映射表中删除该条映射,如图 4所示。
图 4. 控件映射数据结构的维护
实现代码如清单5所示。
清单5 维护控件映射的数据结构
	public int registeWidget(final Widget w) {
		// if existed, return id
		if (Object2IDtable.containsKey(w))
			return Object2IDtable.get(w);

		// add a new listener to the widget
		w.getDisplay().syncExec(new Runnable() {
			public void run() {
				w.addDisposeListener(new WidgetDisposeListener());
			}
		});

		int id = generateUniqueID();
		ID2Objecttable.put(new Integer(id), w);
		Object2IDtable.put(w, new Integer(id));
		return id;
	}
	private class WidgetDisposeListener implements DisposeListener {
		public void widgetDisposed(DisposeEvent e) {
			unregisteWidget(e.widget);
		}

	}

	private void unregisteWidget(Widget w) {
		if (Object2IDtable.containsKey(w)) {
			ID2Objecttable.remove(Object2IDtable.get(w));
			Object2IDtable.remove(w);
		} else {
			// throw new Error("Can not find the widget in Widget Table.");
			System.err.println("Can not find the widget in Widget Table.");
		}
	}
|
RPC动态代理
在实现 XML-RPC 服务以及客户端时,我们采用了 Apache XML-RPC 库的动态代理技术,该技术只需要服务端和客户端公用一套接口类,就能实现它们之间的 XML-RPC 通信。其公用的接口类定义如清单6所示。
清单6 RPC 接口类
// WidgetTesterProxy Abbto SWT WidgetTester
public interface WidgetTesterProxy {
public int actionClick(int id);
public int actionClick(int id, int mask);
public int actionClick(int id, int x, int y);
public int actionClick(int id, int x, int y, int mask);
public int actionClick(int id, int x, int y, int mask, int count);
public int actionClick(int id, int x, int y, String buttons);
public int actionClick(int id, int x, int y, String buttons, int count);
public int actionDoubleClick(int id);
public int actionDoubleClick(int id, int mask);
public int actionKey(int accelerator);
public int actionKeyString(String text);
public int actionFocus(int id);
... //other test methods…
}
// ButtonTesterProxy Abbot SWT ButtonTester
public interface ButtonTesterProxy extends ControlTesterProxy {
public int getAlignment(final int button);
public boolean getSelection(final int button);
public String getText(final int buttonORwidget);
public boolean isTextEditable(final int widget);
}
… //other Tester Proxy interface
//Widget Finder interface Abbot SWT Finder class
public interface WidgetFinderProxy {
public int find(Map<String, String> itemList);
public int find(int parentID, Map<String, String> itemList);
public List<Integer> findAll(Map<String, String> itemList);
public List<Integer> findAll(int parentID, Map<String, String> itemList);
}
|
在服务端实现这些接口,将实现类与接口类一一映射。这是通过RPC服务端的自定义servlet和配置文件所实现的,如清单7和8所示。
清单7 RPC 服务端自定义 servlet
public class MyServlet extends XmlRpcServlet {

	private static final long serialVersionUID = -8197532396221699878L;

	protected XmlRpcHandlerMapping newXmlRpcHandlerMapping()
		throws XmlRpcException {
	URL url = MyServlet.class.getResource("MyHandlers.properties");
	if (url == null) {
	   throw new XmlRpcException("Failed to locate resource MyHandlers.properties");
		}
		try {
			return newPropertyHandlerMapping(url);
		} catch (IOException e) {
	    throw new XmlRpcException("Failed to load resource " +
	                  url + ": " + e.getMessage(), e);
		}
	}
}
|
清单 8 RPC 服务端接口映射配置文件
# autonotes.rpcserver.servlet.MyHandlers.properties
autonotes.control.interfaces.ButtonTesterProxy =
                                 autonotes.control.impl.ButtonTesterProxyImpl
autonotes.control.interfaces.CanvasTesterProxy =
                                 autonotes.control.impl.CanvasTesterProxyImpl
autonotes.control.interfaces.ComboTesterProxy =
                                 autonotes.control.impl.ComboTesterProxyImpl
autonotes.control.interfaces.CompositeTesterProxy =
                                 autonotes.control.impl.CompositeTesterProxyImpl
|
自定义的 servlet 指定了配置文件的路径并读取该配置文件,从而生成接口类和实现类的映射。将对 RPC 服务请求映射成了对不同实现类的方法调用。在具体实现中,只需要实现所有的接口类,并将请求代理到 Abbot SWT 的类中即可,代码片段如清单 9 所示。
清单 9 RPC 接口实现
public class WidgetTesterProxyImpl extends TesterProxy implements
		WidgetTesterProxy {
	private static final Class<?> widgetClass = Widget.class;

	public int actionClick(int id) {
		simpleInvokeForWidget(id, "actionClick", widgetClass);
		return IStatus.ACTION_SUCCESS;
	}

	protected Object simpleInvokeForObject(int id, String name,
			Class<?> actualClass, Class<?> paraClass) {
		return invokeForObject(id, name, null, null, actualClass, paraClass);
	}
protected Object invokeForObject(int id, String name,
Class<?>[] otherParaTypes, Object[] args, Class<?> actualClass, Class<?> paraClass) {
		checkWidgetID(id, actualClass);
		Widget w = (Widget) widgetTable.lookup(id);

		Class<?>[] paraTypes = null;
		Object[] realArgs = null;

		if (null == args) {
			realArgs = new Object[1];
		} else {
			realArgs = new Object[args.length + 1];
			System.arraycopy(args, 0, realArgs, 1, args.length);
		}
		realArgs[0] = w;

		if (null == otherParaTypes) {
			paraTypes = new Class[1];
		} else {
			paraTypes = new Class[otherParaTypes.length + 1];
			System.arraycopy(otherParaTypes, 0, paraTypes, 1,
					otherParaTypes.length);
		}
		paraTypes[0] = paraClass;

		return invoke(name, paraTypes, realArgs, actualClass);
	}
	protected Object invoke(String name, Class<?>[] parameterTypes,
			Object[] args, Class<?> widgetClass) {
		Method method = null;
		String exceptionMsg = "Exception when invoke method: \"" + name
				+ "\" of class " + widgetClass.getName();
		WidgetTester tester = WidgetTester.getTester(widgetClass);

		try {
			method = tester.getClass().getMethod(name, parameterTypes);
		} catch (SecurityException e) {
			log.error(exceptionMsg, e);
			throw new InvokeException(name);
		} catch (NoSuchMethodException e) {
			log.error("no such method: " + name + " in class: "
					+ widgetClass.getName(), e);
			throw new InvokeException(name);
		}

		try {
			return method.invoke(tester, args);
		} catch (IllegalArgumentException e) {
			log.error(exceptionMsg, e);
			throw new InvokeException(name);
		} catch (IllegalAccessException e) {
			log.error(exceptionMsg, e);
			throw new InvokeException(name);
		} catch (InvocationTargetException e) {
			log.error(exceptionMsg, e);
			throw new InvokeException(name);
		}
	}
|
清单 9显示了 WidgetTesterProxy 的 actionClick 方法的实现,actionClick 方法的输入就是被测控件的 ID,其作用是点击该控件,该方法首先将 ID 映射到实际的控件对象中,然后调用 Abbot SWT 的 WidgetTester.actionClick 方法来点击该控件。所有的代理接口类都可以这样实现,其大大简化了 RPC 的实现。
在 RPC 客户端只需重用服务端所提供的接口类,然后通过 Apache XML-RPC 所提供的代理类厂创建代理类对象,就可以直接调用 RPC 方法了,其代码片段如清单 10 所示。
清单 10 RPC 动态代理客户端
		ClientFactory factory = new ClientFactory(getClient());
		ClassLoader cl = Thread.currentThread().getContextClassLoader();
		ClassLoader cl2 = WidgetFinderProxy.class.getClassLoader();
		Thread.currentThread().setContextClassLoader(cl2);

		finder = (WidgetFinderProxy) factory
				.newInstance(WidgetFinderProxy.class);
		widgetTester = (WidgetTesterProxy) factory
				.newInstance(WidgetTesterProxy.class);
		shellTester = (ShellTesterProxy) factory
				.newInstance(ShellTesterProxy.class);
       //... Other dynamic class instance

       // find a shell object and active it
		Map<String, String> conditions = new HashMap<String, String>();
		conditions.put("class", "Shell");
		conditions.put("text", "RCP Product");
		int mainwin = finder.find(conditions);
		shellTester.forceActive(mainwin);
        //...
|
这样,通过动态代理技术,我们很方便地实现了 RPC,在服务端, RPC 代理类将每次的调用转化成 Abbot SWT 的每次调用,在客户端,通过代理类接口和被测控件的 ID ,只需要 Abbot SWT 单元测试用例基本类似的代码,就能实现远程的测试。这类似于测试程序远程地调用 Abbot SWT ,将测试代码的在其他进程中运行。
部署远程测试实例
一个完整的部署本文所介绍的远程测试方法需要如下步骤:
- 在被测的Eclipse软件中安装 Abbot SWT 和autonotes 这两个插件
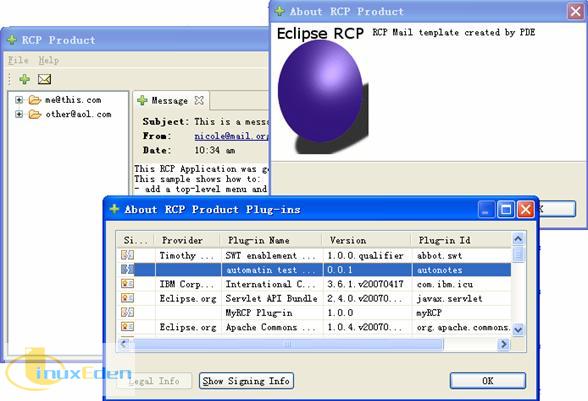
下载本文附件中的 abbot.swt.jar 和 autonotes.jar 这两个插件,安装到被测的 Eclipse 程序的 plugin 目录中。我们以一个简单的富客户端程序来作为被测程序,安装后在插件列表中能看到如图 5所示的界面:
图 5. 安装 abbot.swt 以及 autonotes 插件
- 开发测试用例
在另外一台机器上(也可以是本地),下载本文附件中的 autonotesClient 工程,在 Eclipse 导入该工程,在其中添加一个测试类 simpleTest.TestCase1,继承自 NotesTestCase 类,如清单 11 所示。
清单 11 TestCase1类定义
package simpleTest;

import static org.junit.Assert.assertEquals;
import java.util.HashMap;
import java.util.List;
import java.util.Map;
import org.junit.Test;

public class TestCase1 extends NotesTestCase{

}
|
添加测试用例代码,在函数中添加 @Test 注释,这是因为该用例在 JUnit4 中运行。其代码如清单 12 所示:
清单 12 第一个远程测试用例
	@Test
	public void activeAndkeystroke() {
		Map<String, String> conditions = new HashMap<String, String>();
		conditions.put("class", "Shell");
		conditions.put("text", "RCP Product");
		int mainwin = finder.find(conditions);
		shellTester.forceActive(mainwin);

		conditions.clear();
		conditions.put("class", "Widget");
		List<Integer> text = finder.findAll(mainwin, conditions);
		for(int i : text) {
			System.out.println(widgetTester.getClassName(i));
		}

	int menubar = shellTester.getMenuBar(mainwin);
	for(int ii = 0; ii < 5; ii++) {
		if(mainwin > 0) {
		menuTester.actionClickItem(menubar, "Help/About RCP Product");
				shellTester.waitVisible("About RCP Product");
				conditions.clear();
				conditions.put("class", "Shell");
				conditions.put("text", "About RCP Product");
				int aboutDlg = finder.find(conditions);
				if(aboutDlg > 0) {
//assertEquals(textTester.getText(text), "RCP Mail template created by PDE");

					conditions.clear();
					conditions.put("class", "Button");
					conditions.put("text", "OK");
					int button = finder.find(aboutDlg, conditions);
					buttonTester.actionClick(button);
				}
			}
		}
	}
|
该用例重复 5 次自动化操作,每次首先点击 Help->About RCP Product 菜单,然后等待 About RCP Product 对话框出现,最后点击该对话框中的 OK 按钮。
如果该用例需要在其他机器中远程执行,需要修改样例代码中的 NotesTestCase 中的 getURL 方法,在其中定义被测程序所在的地址,如清单 13 所示。
清单 13 配置 URL
	protected static URL getURL() throws MalformedURLException {
		return new URL("http://127.0.0.1:" + getPort());  //本地运行
//		return new URL("http://192.168.1.10:49887");       //远程运行
	}
|
- 运行测试用例
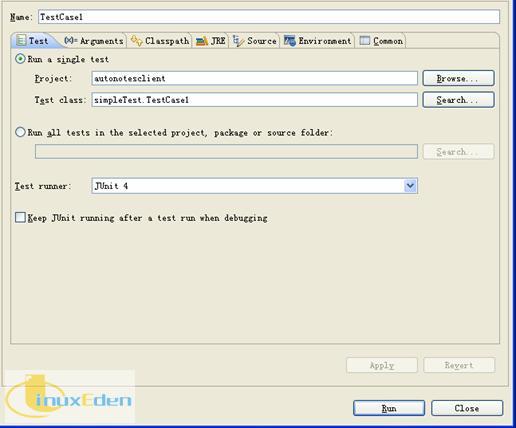
在 Eclipse 中打开运行配置对话框,新建一个 JUnit 运行配置,制定运行用例,设定 JUnit4 作为单元测试运行器,如图 6 所示:
图 6. 运行配置对话框
点击运行,该用例就可以远程测试部署在另外一台机器上的 Eclipse 程序了。JUnit4 将运行该用例类,而该用例通过 XML-RPC 的代理类,和其他进程中的 Eclipse 程序中 autonotes 插件通信,远程调用和被测程序处在同一进程的 Abbot SWT 库,从而实现了远程 GUI 功能自动化测试。
本文中样例程序只是一个简单的原型,其中包括了自动化测试服务插件 autonotes 以及一个测试用例支持包 autonotesClient。我们只需要基于 autonotesClient 工程,就能创建基于自己的测试用例,而只需要将 abbot.swt 插件和 autonotes 插件安装在被测程序中,就能和基于 autonotesClient 工程的测试用例进行 XML-RPC 通信,进行各种 GUI 功能测试。
总结及展望
本文介绍了一种结合 XML-RPC 和 Abbot SWT 库来进行 Eclipse 程序的远程测试的技术。该技术不仅仅适用于测试一个远程的 Eclipse 程序,还可以在一次测试用例同时测试2个甚至更多机器上的 Eclipse 程序,这样大大扩展了 Abbot SWT 的功能,将其只能从一个本地的单元测试工具扩展到一个跨进程,跨网络的自动化测试工具。远程测试尤其适用于网络中的协作软件的功能自动化测试,例如即时通信,网络协作,富客户端程序等等。本文所提供的样例程序虽然只是一个原型,但已近具备了完整的远程自动化测试 Eclipse 程序的功能,有兴趣的作者可以进一步扩展该库,使之功能更加完善。(责任编辑:A6)