 3G Eden
 RSS
RSSCognos BI 是一个在面向服务的体系结构上提供报表、分析、企业事件管理等完整 BI 功能的 BI 产品。本文将介绍如何在 linux 上安装 Cognos 8 BI Server,以及如何与 IBM Http Server, WAS, DB2 进行配置。
Cognos 8 产品架构
Cognos 8 是一个多层架构的产品,如图 1 所示,Cognos 8 根据不同的业务功能和能被防火墙分开被分为三层 : 第一层是 Web 服务器(Web Server)层,第二层是应用(Application)层,第三层是数据(Data)层。位于三层之上的是用户接口(User Interfaces)。
图 1. Cognos 8 产品架构

Web 服务器(Web Server)层包括一到多个 Web 服务器和一到多个 Cognos8 网关(Gateways)。Cognos8 网关是 Web 服务器的扩展,它把从 Web 服务器接收到的信息传递给应用(Application)层的服务器。Web 服务器可以用 IBM Http Server 或者 Apache,在安装 Cognos8 BI Server 的时候需要单独安装 Web 服务器,本文采用 IBM Http Server 作为 Web 服务器。
应用(Application)层包括一个应用服务器和一到多个 Cognos8 服务器,它是 Cognos 的核心层。Cognos8 服务器执行从网关(Gateways)发过来的请求(Requests),比如:报表(Reports),分析(Analyses)和查询(Queries)。应用服务器可以用 Cognos 自带的 tomcat,也可以用 WAS,本文采用 WAS 作为应用服务器。
数据(Data)层包括 Content Store,数据源(Data Source)和 Metric Store。Content Store 是一个关系型数据库,用来存储 Cognos 8 所需的元数据,比如:报表的规格,已发布的模型和包,数据源的连接信息等。Content Store 可以用 Cognos 自带的轻量级数据库 Derby,也可以用别的关系型数据库。本文将采用 DB2 作为 Content Store。数据源(Data Source)和 Metric Store 在安装的时候不用考虑。
Cognos8 BI 用户接口层(User Interface)在服务器端包括 Query Studio,Analysis Studio,Report Studio,Event Studio 等组件。
安装前准备
系统要求
Cognos BI Server 可以安装在以下操作系统:
- Windows
- UNIX(Sun Solaris, HP-UX, IBM AIX)
- Linux
机器内存最小为 2G,可用硬盘空间最小为 3.5G,其中 2.5G 为软件安装所需,1G 为 Cognos BI Server 各组件作为临时文件夹所用。
安装 IHS
在安装 Cognos BI Server 之前,必须先安装一个 Web 服务器,并且 Web 服务器需处于启动状态。(请参照“参考资源”对应资源)
安装 WAS
在配置 Cognos BI Server 之前,必须先安装一个应用服务器。(请参照“参考资源”对应资源)
安装 DB2
在配置 Cognos BI Server 之前,必须创建一个可以作为 Content Store 的关系型数据库。(请参照“参考资源”对应资源)
准备数据库
如代码 1 所示创建作为 Content Store 的数据库,并查看这个数据库的代码页。作为 Content Store 的数据库的代码页必须为 1208。
清单 1. 创建数据库
db2inst1@cognos-heyuan:~> db2 create db content using codeset UTF-8 territory US DB20000I The CREATE DATABASE command completed successfully. db2inst1@cognos-heyuan:~> db2 get db cfg for content | grep "code page" Database code page |
作为 Content Store 的数据库需要有页面大小分别为 4k,8k,16k 和 32k 的缓冲池(buffer pool),创建数据库的时候会默认创建页面大小为 4k 缓冲池,还需创建页面大小为 8k,16k 和 32k 的缓冲池,如代码 2 所示。
清单 2. 创建 buffer pool
db2inst1@cognos-heyuan:~> db2 connect to content Database Connection Information Database server = DB2/LINUX 9.5.0 SQL authorization ID = DB2INST1 Local database alias = CONTENT db2inst1@cognos-heyuan:~> db2 create bufferpool BF8 immediate size 250 pagesize 8k DB20000I The SQL command completed successfully. db2inst1@cognos-heyuan:~> db2 create bufferpool BF16 immediate size 250 pagesize 16k DB20000I The SQL command completed successfully. db2inst1@cognos-heyuan:~> db2 create bufferpool BF32 immediate size 250 pagesize 32k DB20000I The SQL command completed successfully. db2inst1@cognos-heyuan:~> db2 connect reset DB20000I The SQL command completed successfully. |
作为 Content Store 的数据库需要有页面大小为 32k 的系统临时表空间(system temporary tablespace),页面大小为 4k 的用户临时表空间(user temporary tablespace),以及页面大小分别为 4k 和 8k 的用户表空间(regular user tablespace)。如代码 2 所示创建这些所需的表空间。
清单 3. 创建 tablespace
db2inst1@cognos-heyuan:~> db2 connect to content Database Connection Information Database server = DB2/LINUX 9.5.0 SQL authorization ID = DB2INST1 Local database alias = CONTENT db2inst1@cognos-heyuan:~> db2 create system temporary tablespace STMP pagesize 32k managed by automatic storage extentsize 16 overhead 10.5 prefetchsize 16 transferrate 0.14 bufferpool BF32 DB20000I The SQL command completed successfully. db2inst1@cognos-heyuan:~> db2 create user temporary tablespace UTMP pagesize 4k managed by automatic storage extentsize 16 overhead 10.5 prefetchsize 16 transferrate 0.14 bufferpool IBMDEFAULTBP DB20000I The SQL command completed successfully. db2inst1@cognos-heyuan:~> db2 create regular tablespace RUTS pagesize 4k managed by automatic storage extentsize 16 overhead 10.5 prefetchsize 16 transferrate 0.14 bufferpool IBMDEFAULTBP dropped table recovery on DB20000I The SQL command completed successfully. db2inst1@cognos-heyuan:~> db2 create regular tablespace RUTS8 pagesize 8k managed by automatic storage extentsize 16 overhead 10.5 prefetchsize 16 transferrate 0.14 bufferpool BF8 dropped table recovery on DB20000I The SQL command completed successfully. db2inst1@cognos-heyuan:~> db2 connect reset DB20000I The SQL command completed successfully. |
安装和配置 Cognos BI 产品
安装 Cognos BI 产品
如代码 4 所示启动 Cognos 安装界面,默认的安装路径为“/opt/cognos/c8/”,选择要安装的三个组件 Application Tier Component,Gateway 和 Content Manager,如图 2 所示。
清单 4. 启动 Cognos 安装界面
cognos-heyuan:/data/Cognos/linuxi386 # ./issetup |
图 2. Cognos 安装界面

拷贝 Cognos 所需文件
安装完成后,如代码 4 所示拷贝 Cognos 所需文件。
清单 5. 配置环境变量
cognos-heyuan:~ # cp /home/db2inst1/sqllib/java/db2java.zip
                                 /opt/cognos/cps/p2pd/WEB-INF/lib/db2java.jar
cognos-heyuan:~ # cp /opt/cognos/c8/bin/jre/1.5.0/lib/ext/bcprov-jdk14-134.jar
                                /opt/IBM/We/AppServer/java/jre/lib/ext/.
cognos-heyuan:~ # cp /opt/cognos/c8/bin/jcam_jni.jar
                                /opt/IBM/WebSphere/Ar/lib/ext/.
|
配置系统环境变量
在配置 Cognos BI Server 之前,需要配置代码 5 所示的环境变量:
清单 6. 配置环境变量
export JAVA_HOME=/opt/IBM/WebSphere/AppServer/java/jre -- WAS 的安装路径 export CLASSPATH=$CLASSPATH:$JAVA_HOME/lib export PATH=$JAVA_HOME/bin:$PATH:$HOME/bin export DB2DIR=/opt/IBM/db2/V9.5 -- DB2 的安装路径 export LD_LIBRARY_PATH=/opt/cognos/c8/bin export LD_LIBRARY_PATH=/usr/lib:$DB2DIR/lib32:$LD_LIBRARY_PATH export DB2INSTANCE=db2inst1 -- DB2 instance 的名字 |
配置 Cognos
如代码 6 所示启动 Cognos 配置界面
清单 7. 启动 Cognos 配置界面
cognos-heyuan:/opt/cognos/c8/bin # ./cogconfig.sh |
本文中的 Content Store 采用 DB2 的数据库,而默认的 Content Store 是 SQL Server 的数据库。所以先删除默认的 Content Store,再新建 DB2 的 Content Store。如图 3 所示,右键点击“Content Store”删除默认的 Content Store。
图 3. 删除默认的 Content Store

右键点击“Content Manager”新建一个 Content Store,如图 4 所示。
图 4. 创建 Content Store

选择数据库的类型为 DB2,如图 5 所示。
图 5. 选择数据库类型为 DB2

输入数据库的名称为之前所建的 C8,输入数据库的用户名和密码,如图 6 所示。
图 6. 选择数据库

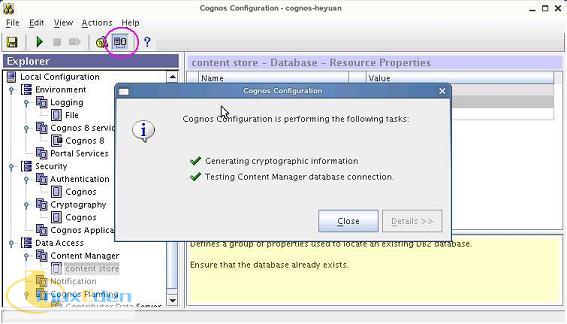
测试 Content Store,如图 7 所示。
图 7. 测试 Content Store
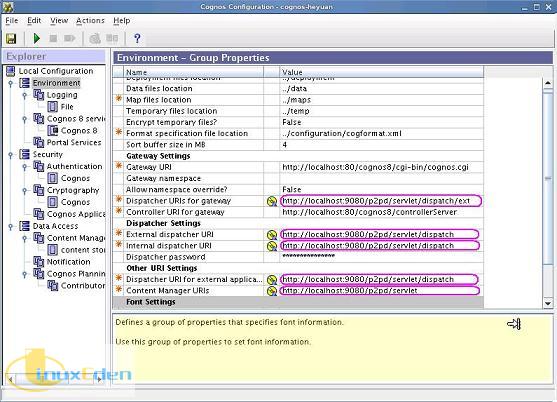
本文中应用服务器采用 WAS,WAS 的端口号一般为 9080,而默认的应用服务器是 tomcat,tomcat 的端口号是 9300。所以在 Cognos 环境配置中,把端口号 9300 改为 9080,如图 8 所示。
图 8. 修改环境配置
保存修改,图 9 所示,在保存的同时 Cognos 会自动检测配置信息。
图 9. 保存修改

配置 WAS
本文采用 ear 模块把 Cognos 作为一个应用程序部署到 WAS 上。
首先要准备 ear 包。
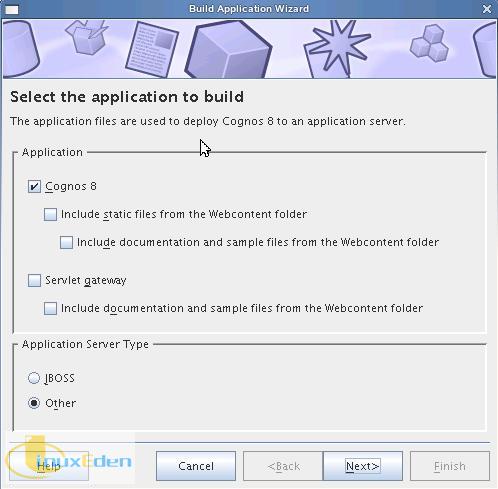
同样在“Cognos Configration”窗口,从菜单“Action -> Build Application Files…”打开“Build Application Wizard”,如图 10 所示。
图 10. 打开“Build Application Wizard”
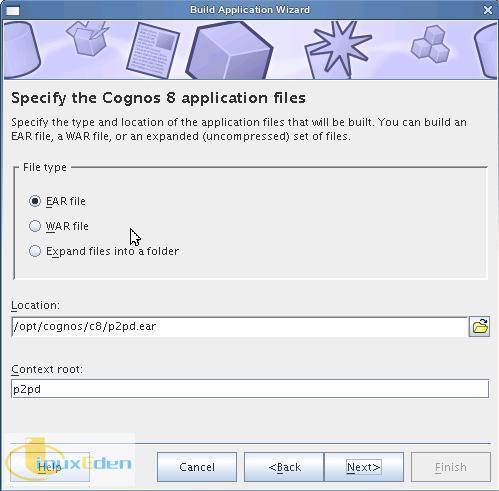
选择文件类型为“EAR File”,生成的 ear 文件默认的名字为 p2pd.ear,放在文件夹 /opt/cognos/c8/ 下,如图 11 所示。
图 11. 生成 ear 文件
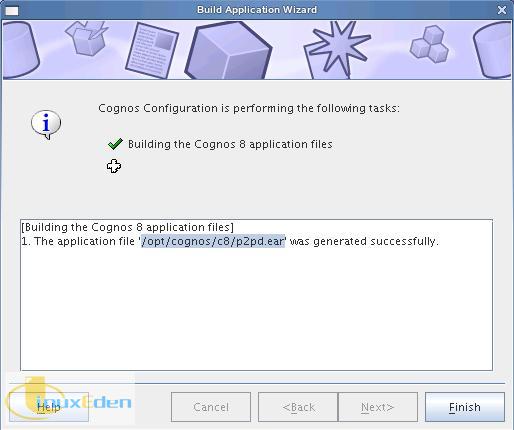
ear 包生成成功后如图 12 所示。
图 12. ear 包生成成功
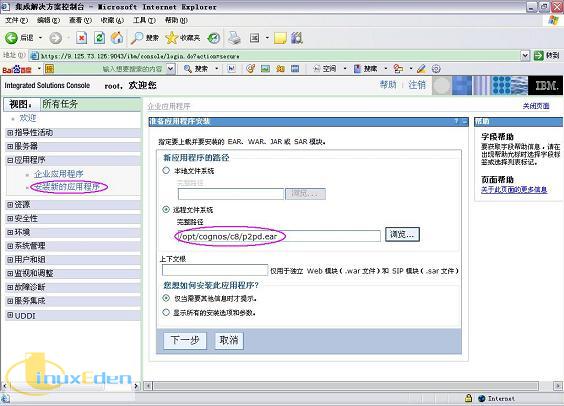
然后部署 ear 包。打开 IE,通过 http://<hostname>/<ip>:9060/ibm/console 进入 WAS 控制台,进入“安装新的应用程序”页面,部署刚才准备好的 ear 包,如图 13 所示。
图 13. 准备部署 ear 包
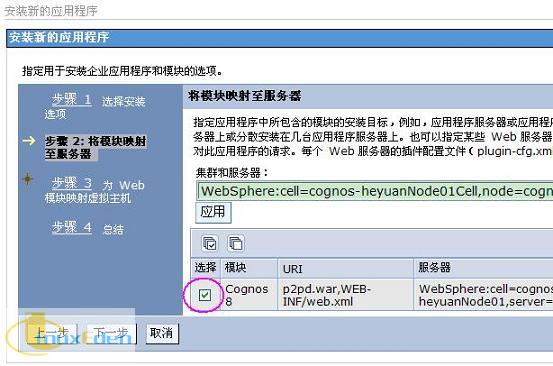
在“步骤二:将模块映射至服务器”,选择模块“Cognos8”,如图 14 所示。
图 14. 将模块映射至服务器
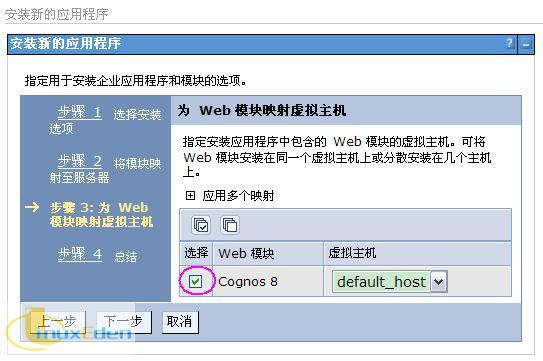
在“步骤三:为 Web 模块映射虚拟主机”,选择模块“Cognos8”,如图 15 所示。
图 15. 为 Web 模块映射虚拟主机
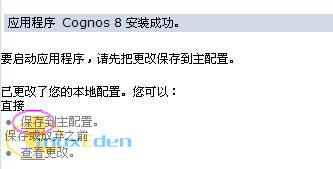
应用程序安装完成后,保存应用程序到主配置,如图 16 所示。
图 16. 保存应用程序 Cognos8 到主配置
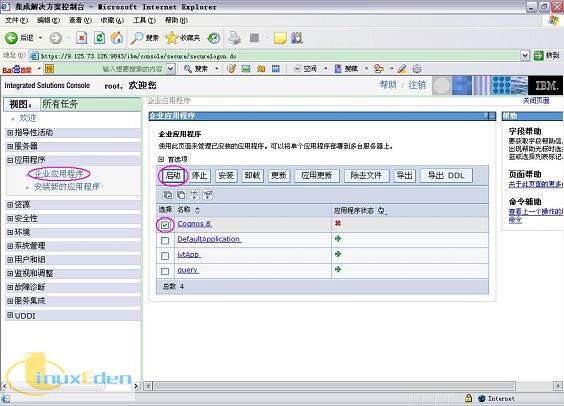
接下来启动 Cognos8。从“应用程序 -> 企业应用程序”,启动名称为“Cognos8”的应用程序,如图 17 所示。
图 17. 启动 Cognos 8
Cognos 启动成功后如图 18 所示。
图 18. Cognos8 启动成功

配置 IHS
本文中 Web 服务器采用 IBM Http Server。需要把 Cognos 的目录添加到 HIS 的配置中。修改 IHS 的配置文件 httpd.conf,默认在文件夹 /opt/IBM/HTTPServer/conf 下面。在文件的最后加入代码 6 所示的虚拟目录。
清单 8. 虚拟目录
ScriptAlias /cognos8/cgi-bin/ /opt/cognos/c8/cgi-bin/ <Directory "/opt/cognos/c8/cgi-bin"> AllowOverride None Options None Order allow,deny Allow from all </Directory> Alias /cognos8 /opt/cognos/c8/webcontent/ <Directory "/opt/cognos/c8/webcontent/"> Options Indexes MultiViews AllowOverride None Order allow,deny Allow from all </Directory> |
重启 IHS 使修改生效,如代码 7 所示。
清单 9. 重启 IHS
cognos-heyuan:/opt/IBM/HTTPServer/bin # ./apachectl stop cognos-heyuan:/opt/IBM/HTTPServer/bin # ./apachectl start |
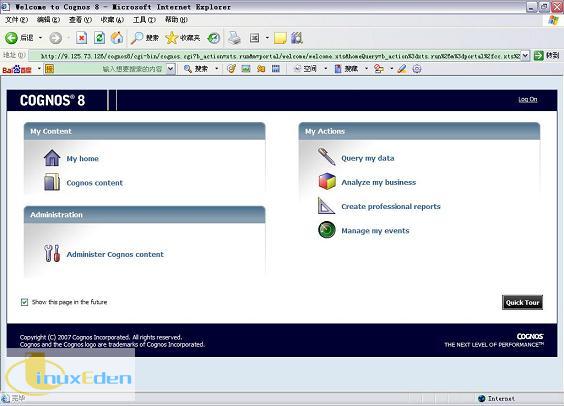
验证
至此,Cognos8 BI Server 的安装和配置已经完成。打开 IE,通过 http://<hostname>/<ip>/cognos8/ 进入 Cognos8 的门户,如图 19 所示
图 19. Cognos8 门户
总结
本文介绍了 Cognos8 BI Server 与 HIS, WAS 和 DB2 等产品在 Linux 平台上的安装、配置全过程。本过程在 SLES 10 上完成,对于 Unix 和 Windows 平台上的安装、配置过程与 Linux 基本相同。希望本文能为大家在 Cognos8 BI Server 安装配置方面提供一些借鉴和帮助。(责任编辑:A6)