单线程
任何程序至少有一个线程,即使你没有主动地创建线程,程序从一开始执行就有一个默认的线程,被称为主线程,只有一个线程的程序称为单线程程序。如下面这一简单的代码,没有显示地创建一个线程,程序从main开始执行,main本身就是一个线程(主线程),单个线程从头执行到尾。
【Demo1】:单线程程序
public static void main(String args[]) { System.out.println("输出从1到100的数:"); for (int i = 0; i < 100; i ++) { System.out.println(i + 1); }} |
创建线程
单线程程序简单明了,但有时无法满足特定的需求。如一个文字处理的程序,我在打印文章的同时也要能对文字进行编辑,如果是单线程的程序则要等打印机打印完成之后你才能对文字进行编辑,但打印的过程一般比较漫长,这是我们无法容忍的。如果采用多线程,打印的时候可以单独开一个线程去打印,主线程可以继续进行文字编辑。在程序需要同时执行多个任务时,可以采用多线程。
在程序需要同时执行多个任务时,可以采用多线程。Java给多线程编程提供了内置的支持,提供了两种创建线程方法:1.通过实现Runable接口;2.通过继承Thread类。
Thread是JDK实现的对线程支持的类,Thread类本身实现了Runnable接口,所以Runnable是显示创建线程必须实现的接口; Runnable只有一个run方法,所以不管通过哪种方式创建线程,都必须实现run方法。我们可以看一个例子。
【Demo2】:线程的创建和使用
/** * Created with IntelliJ IDEA. * User: luoweifu * Date: 15-5-24 * Time: 下午9:30 * To change this template use File | Settings | File Templates. *//** * 通过实现Runnable方法 */class ThreadA implements Runnable { private Thread thread; private String threadName; public ThreadA(String threadName) { thread = new Thread(this, threadName); this.threadName = threadName; } //实现run方法 public void run() { for (int i = 0; i < 100; i ++) { System.out.println(threadName + ": " + i); } } public void start() { thread.start(); }}/** * 继承Thread的方法 */class ThreadB extends Thread { private String threadName; public ThreadB(String threadName) { super(threadName); this.threadName = threadName; } //实现run方法 public void run() { for (int i = 0; i < 100; i ++) { System.out.println(threadName + ": " + i); } }}public class MultiThread{ public static void main(String args[]) { ThreadA threadA = new ThreadA("ThreadA"); ThreadB threadB = new ThreadB("ThreadB"); threadA.start(); threadB.start(); }} |
说明:上面的例子中例举了两种实现线程的方式。大部分情况下选择实现Runnable接口的方式会优于继承Thread的方式,因为:
1. 从 Thread 类继承会强加类层次;
2. 有些类不能继承Thread类,如要作为线程运行的类已经是某一个类的子类了,但Java只支持单继承,所以不能再继承Thread类了。
线程同步
线程与线程之间的关系,有几种:
模型一:简单的线程,多个线程同时执行,但各个线程处理的任务毫不相干,没有数据和资源的共享,不会出现争抢资源的情况。这种情况下不管有多少个线程同时执行都是安全的,其执行模型如下:

图 1:处理相互独立的任务
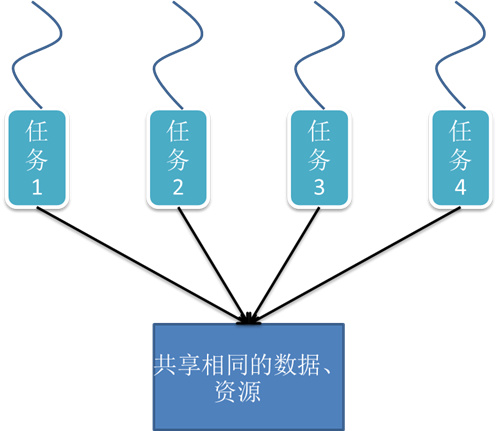
模型二:复杂的线程,多个线程共享相同的数据或资源,就会出现多个线程争抢一个资源的情况。这时就容易造成数据的非预期(错误)处理,是线程不安全的,其模型如下:

图 2:多个线程共享相同的数据或资源
在出现模型二的情况时就要考虑线程的同步,确保线程的安全。Java中对线程同步的支持,最常见的方式是添加synchronized同步锁。
我们通过一个例子来看一下线程同步的应用。
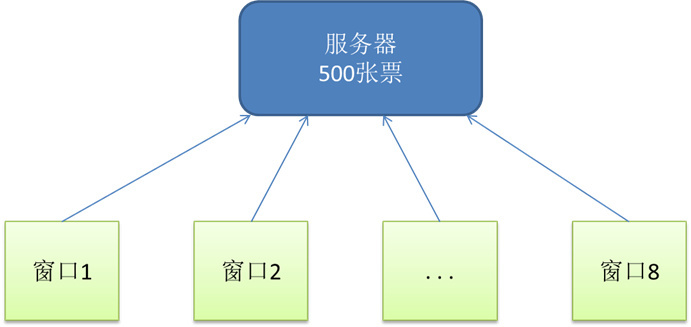
买火车票是大家春节回家最为关注的事情,我们就简单模拟一下火车票的售票系统(为使程序简单,我们就抽出最简单的模型进行模拟):有500张从北京到赣州的火车票,在8个窗口同时出售,保证系统的稳定性和数据的原子性。

图 3:模拟火车票售票系统
【Demo3】:火车票售票系统模拟程序
/** * 模拟服务器的类 */class Service { private String ticketName; //票名 private int totalCount; //总票数 private int remaining; //剩余票数 public Service(String ticketName, int totalCount) { this.ticketName = ticketName; this.totalCount = totalCount; this.remaining = totalCount; } public synchronized int saleTicket(int ticketNum) { if (remaining > 0) { remaining -= ticketNum; try { //暂停0.1秒,模拟真实系统中复杂计算所用的时间 Thread.sleep(100); } catch (InterruptedException e) { e.printStackTrace(); } if (remaining >= 0) { return remaining; } else { remaining += ticketNum; return -1; } } return -1; } public synchronized int getRemaining() { return remaining; } public String getTicketName() { return this.ticketName; }}/** * 售票程序 */class TicketSaler implements Runnable { private String name; private Service service; public TicketSaler(String windowName, Service service) { this.name = windowName; this.service = service; } @Override public void run() { while (service.getRemaining() > 0) { synchronized (this) { System.out.print(Thread.currentThread().getName() + "出售第" + service.getRemaining() + "张票,"); int remaining = service.saleTicket(1); if (remaining >= 0) { System.out.println("出票成功!剩余" + remaining + "张票."); } else { System.out.println("出票失败!该票已售完。"); } } } }} |
测试程序:
/** * 测试类 */public class TicketingSystem { public static void main(String args[]) { Service service = new Service("北京-->赣州", 500); TicketSaler ticketSaler = new TicketSaler("售票程序", service); //创建8个线程,以模拟8个窗口 Thread threads[] = new Thread[8]; for (int i = 0; i < threads.length; i++) { threads[i] = new Thread(ticketSaler, "窗口" + (i + 1)); System.out.println("窗口" + (i + 1) + "开始出售 " + service.getTicketName() + " 的票..."); threads[i].start(); } }} |
结果如下:
窗口1开始出售 北京–>赣州 的票… 窗口2开始出售 北京–>赣州 的票… 窗口3开始出售 北京–>赣州 的票… 窗口4开始出售 北京–>赣州 的票… 窗口5开始出售 北京–>赣州 的票… 窗口6开始出售 北京–>赣州 的票… 窗口7开始出售 北京–>赣州 的票… 窗口8开始出售 北京–>赣州 的票… 窗口1出售第500张票,出票成功!剩余499张票. 窗口1出售第499张票,出票成功!剩余498张票. 窗口6出售第498张票,出票成功!剩余497张票. 窗口6出售第497张票,出票成功!剩余496张票. 窗口1出售第496张票,出票成功!剩余495张票. 窗口1出售第495张票,出票成功!剩余494张票. 窗口1出售第494张票,出票成功!剩余493张票. 窗口2出售第493张票,出票成功!剩余492张票. 窗口2出售第492张票,出票成功!剩余491张票. 窗口2出售第491张票,出票成功!剩余490张票. 窗口2出售第490张票,出票成功!剩余489张票. 窗口2出售第489张票,出票成功!剩余488张票. 窗口2出售第488张票,出票成功!剩余487张票. 窗口6出售第487张票,出票成功!剩余486张票. 窗口6出售第486张票,出票成功!剩余485张票. 窗口3出售第485张票,出票成功!剩余484张票. …… |
在上面的例子中,涉及到数据的更改的Service类saleTicket方法和TicketSaler类run方法都用了synchronized同步锁进行同步处理,以保证数据的准确性和原子性。
关于synchronized更详细的用法请参见:《Java中Synchronized的用法》
线程控制
在多线程程序中,除了最重要的线程同步外,还有其它的线程控制,如线程的中断、合并、优先级等。
线程等待(wait、notify、notifyAll)
- Wait:使当前的线程处于等待状态;
- Notify:唤醒其中一个等待线程;
- notifyAll:唤醒所有等待线程。
详细用法参见:《 Java多线程中wait, notify and notifyAll的使用》
线程中断(interrupt)
在Java提供的线程支持类Thread中,有三个用于线程中断的方法:
- public void interrupt(); 中断线程。
- public static boolean interrupted(); 是一个静态方法,用于测试当前线程是否已经中断,并将线程的中断状态 清除。所以如果线程已经中断,调用两次interrupted,第二次时会返回false,因为第一次返回true后会清除中断状态。
- public boolean isInterrupted(); 测试线程是否已经中断。
【Demo4】:线程中断的应用
/** * 打印线程 */class Printer implements Runnable { public void run() { while (!Thread.currentThread().isInterrupted()) { //如果当前线程未被中断,则执行打印工作 System.out.println(Thread.currentThread().getName() + "打印中… …"); } if (Thread.currentThread().isInterrupted()) { System.out.println("interrupted:" + Thread.interrupted()); //返回当前线程的状态,并清除状态 System.out.println("isInterrupted:" + Thread.currentThread().isInterrupted()); } }} |
调用代码:
Printer printer = new Printer();Thread printerThread = new Thread(printer, "打印线程");printerThread.start();try { Thread.sleep(100);} catch (InterruptedException e) { e.printStackTrace();}System.out.println("有紧急任务出现,需中断打印线程.");System.out.println("中断前的状态:" + printerThread.isInterrupted());printerThread.interrupt(); // 中断打印线程System.out.println("中断前的状态:" + printerThread.isInterrupted()); |
结果:
打印线程打印中… … … … 打印线程打印中… … 有紧急任务出现,需中断打印线程. 打印线程打印中… … 中断前的状态:false打印线程打印中… … 中断前的状态:trueinterrupted:trueisInterrupted:false |
线程合并(join)
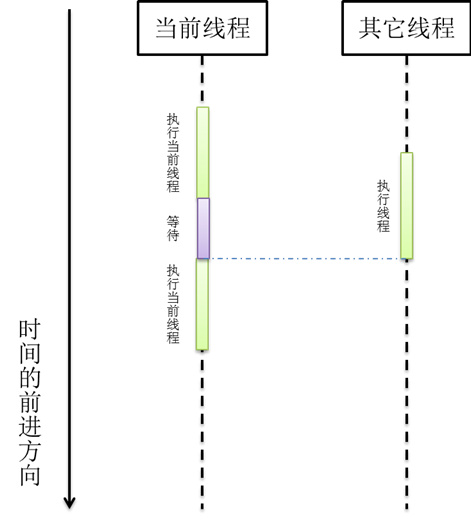
所谓合并,就是等待其它线程执行完,再执行当前线程,执行起来的效果就好像把其它线程合并到当前线程执行一样。其执行关系如下:

图 4:线程合并的过程
public final void join()
等待该线程终止public final void join(long millis);
等待该线程终止的时间最长为 millis 毫秒。超时为 0 意味着要一直等下去。public final void join(long millis, int nanos)
等待该线程终止的时间最长为 millis 毫秒 + nanos 纳秒
这个常见的一个应用就是安装程序,很多大的软件都会包含多个插件,如果选择完整安装,则要等所有的插件都安装完成才能结束,且插件与插件之间还可能会有依赖关系。
【Demo5】:线程合并
/** * 插件1 */class Plugin1 implements Runnable { @Override public void run() { System.out.println("插件1开始安装."); System.out.println("安装中..."); try { Thread.sleep(1000); } catch (InterruptedException e) { e.printStackTrace(); } System.out.println("插件1完成安装."); }}/** * 插件2 */class Plugin2 implements Runnable { @Override public void run() { System.out.println("插件2开始安装."); System.out.println("安装中..."); try { Thread.sleep(2000); } catch (InterruptedException e) { e.printStackTrace(); } System.out.println("插件2完成安装."); }} |
合并线程的调用:
System.out.println("主线程开启...");Thread thread1 = new Thread(new Plugin1());Thread thread2 = new Thread(new Plugin2());try { thread1.start(); //开始插件1的安装 thread1.join(); //等插件1的安装线程结束 thread2.start(); //再开始插件2的安装 thread2.join(); //等插件2的安装线程结束,才能回到主线程} catch (InterruptedException e) { e.printStackTrace();}System.out.println("主线程结束,程序安装完成!"); |
结果如下:
主线程开启… 插件1开始安装. 安装中… 插件1完成安装. 插件2开始安装. 安装中… 插件2完成安装. 主线程结束,程序安装完成! |
优先级(Priority)
线程优先级是指获得CPU资源的优先程序。优先级高的容易获得CPU资源,优先级底的较难获得CPU资源,表现出来的情况就是优先级越高执行的时间越多。
Java中通过getPriority和setPriority方法获取和设置线程的优先级。Thread类提供了三个表示优先级的常量:MIN_PRIORITY优先级最低,为1;NORM_PRIORITY是正常的优先级;为5,MAX_PRIORITY优先级最高,为10。我们创建线程对象后,如果不显示的设置优先级的话,默认为5。
【Demo】:线程优先级
/** * 优先级 */class PriorityThread implements Runnable{ @Override public void run() { for (int i = 0; i < 1000; i ++) { System.out.println(Thread.currentThread().getName() + ": " + i); } }} |
调用代码:
//创建三个线程Thread thread1 = new Thread(new PriorityThread(), "Thread1");Thread thread2 = new Thread(new PriorityThread(), "Thread2");Thread thread3 = new Thread(new PriorityThread(), "Thread3");//设置优先级thread1.setPriority(Thread.MAX_PRIORITY);thread2.setPriority(8);//开始执行线程thread3.start();thread2.start();thread1.start(); |
从结果中我们可以看到线程thread1明显比线程thread3执行的快。
 3G Eden
 RSS
RSS